Virbhadrasana I
Posted On : 12 October 2016.
Posted By : Yogi Mahesh Chetan.
Virbhadrasana I
Word Meaning:Vira = warrior, bhadra= Gentle/humble (gentle as in gentleman) Word meaning will be humble, brave warrior.
This is a standing, balancing, strengthening and beginner kind of pose
Meaning of Virabhadrasana I or Warrior Pose I from India point of view According to Indian mythology, there was a warrior named Virabhadra, an incarnation of God Shiva, known to have 1000 heads, 1000 eyes, 1000 feet and carrying 1000 clubs. He was born to kill demons. This pose has been named after him and is thus called the Warrior pose. There are three variations of this pose, of which the one explained here is the easiest and main pose.
Steps and detailed method of Warrior Pose
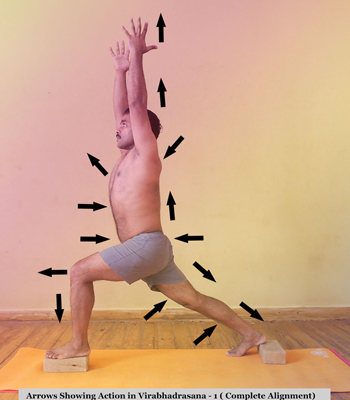
Basic Concept used while doing Warrior pose There are three directional movements in this pose:
The first one is to move ahead through your foreleg, (pull and push movement) the second is to fall back on your hind leg, (push back foot on ground, backward movement) and third is to move skyward using your trunk. (Upward movement).
There are some back bending in this pose but it’s not exactly a back bend, yet many people consider Virabhadrasana I as first backbend. Though it can be regarded as a good way to prepare for back bending. For perfect alignment try backbone straight in this pose.
You must start this pose by jumping on your feet (do not jump in case back pain or knee pain), towards sides and into Utthita Padasana, also known as ‘Starfish pose’.
Before turning to the side, you must first raise your hands in Urdhva Hastasana so that you will be able to balance your arms in a regular position.
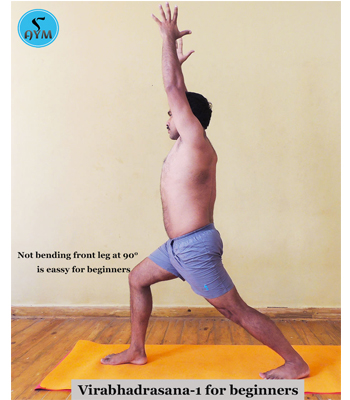
While doing a full pose of this asana, you must initially keep the same distance as that kept while doing Trikonasana. In the beginning, you can do this asana by making your steps shorter than normal (if your hip in not flexible or you are a beginner).
Learning Virabhadrasana correctly, it is vital to work on the base, which are your legs. Put your back foot a little more to the inward position than you put it in Trikonasana. To be comfortable while doing this pose, you should learn to adjust your back foot according to once flexibility in the ankle by listening to what it says.
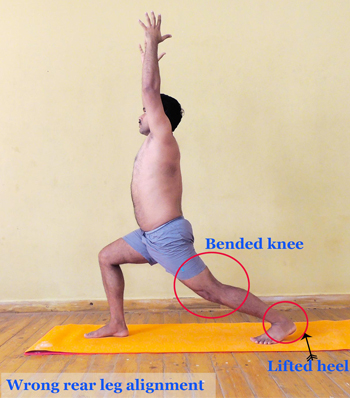
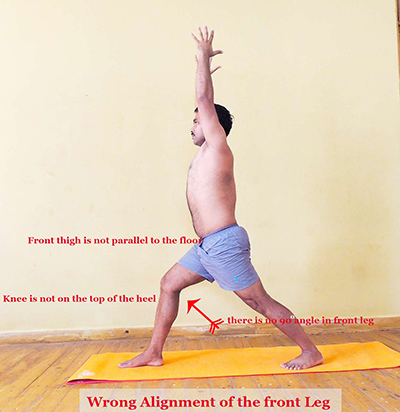
Stretching the skin of the soles of both your feet to extend and widen them further so that your connection with the ground is firm and stable. Best time to stretch it when you are about to turn your foot out. Your front leg should be bending at the 90˚ angle, see that your knee is on top of heal or not. To put less pressure on the knee, you must be extending femur bone towards the knee and counter this move by drawing knee back towards the hip. And to keep your knee move straight ahead your foot (in the direction of your second toe), you must extend your inner frontal femur from your groin to your knee and also counter it.
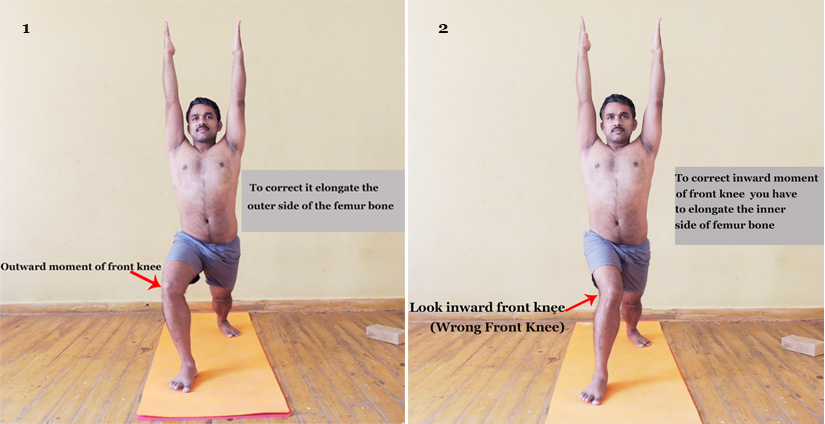
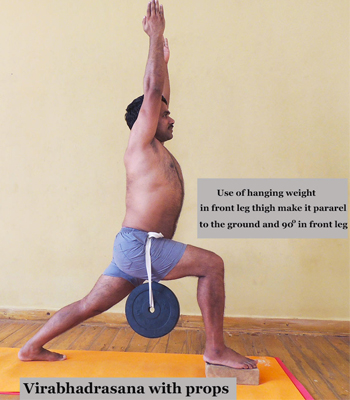
You might feel that you are moving forward your knee to the outer side of your forefoot to successfully attain this alignment Your feet should be well distanced so that when you start bending your full knee, then your thigh will be parallel to the floor, just like Virabhadrasana II. The thigh of your front leg must actively pull back into the butt opening of the abdomen. Stay alert about in your hind leg as you stretch it out, and ensure that it remains straight while bending your front knee.
While firmly forcing your shinbone back, focus on maintaining your hind leg in the straight position as the hind knee has the tendency of bending. Extend downwards into your heel using your rear hind calf. You must strongly stand on your heels. Press the outer edge of your rear foot downwards towards the floor while lifting the bottom side of your hind leg towards the roof. While doing this pose, you will feel that your back leg is grumbling. Though it is an important condition in this pose, it is not easy to firmly push back the thigh as done in Adhomukha Svanasana, while keeping it straight and in a lifted position.
Now actively expand your hind leg backward as much as you extend your inner arms upwards. Due to their usual tendency, people keep bending their hind leg in this pose. While focusing on your hind leg’s 1/3rd part, try moving it back efficiently. Ensure that you don’t give up the straight posture of your hind leg. Move forward your back butt without using the extension of your hind leg.
Now bring the skin of your hamstrings inwards to open the back part of your hind thigh as you move the bone of your hind thigh towards your hamstring. You must pull back the inside part of your hind femur more than using the outer part, to help attain the inward rotation of your hind leg; as you pull back your hind femur extremely into the backside of your leg.
To keep your hind leg rotating inwards and completely straight, as against Virabhadrasana II, Trikonasana, and Parsvakonasana, is one of the toughest things to keep in this pose. You must not rotate your hind leg in such a way that your knee faces in the direction of the floor. To bring consciousness to your inner femur, you must distance your femurs away from each other. See to it that your inner femurs don’t cross each other else you will have to open up and spread out your legs a bit more.
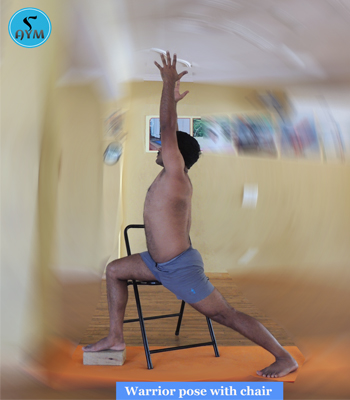
Next, you should get the feeling of turning your chest and abdomen towards your foreleg. In the beginning, take fewer gaps in between your legs to align the movement in the hip, abdomen, and chest. You can place a sandbag or a pillow or wooden block under your hind heel to let that heel firm with the ground.
This will help you in doing the pose easily, and without taking too much pressure on your legs.
Turn and twist the abdomen in the direction of the foreleg in such a way that naval comes in front of you.
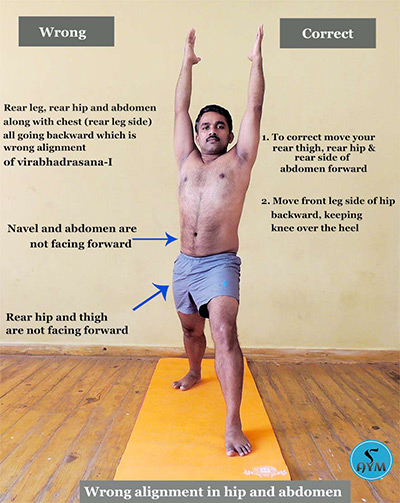
The alignment of this pose is very similar as in other two poses i.e. Parsvottanasana and Parivritta Trikonasana. Yoga practitioners have a general tendency of not turning the hind hip actively forward enough, such that it can be brought in line with the frontal hip.
You can counter this movement by turning your front hip and butts backward, combined with a strong forward action in your hind hip.
To assist your abdomen in facing forward, you must move your rear hip bone away from your tailbone we say it applying moola bandha which connect hip to the abdomen and bring strength in the body. You will be able to perform this movement quickly with the passage of time and with increased hip flexibility. What’s more significant is that you must get your hips squared and in the direction of your fore leg, followed by getting your rear heel on the ground.
When you prepare for this pose, ensure that your tummy is not coming forward, while turning to the side. Move your abdomen inwards and skywards to lift up your chest. We say it is applying Uddyana bandha which bring straightness in the lower area of the back.
Set your pubis straight forward towards your fore foot with your abdomen squared towards that foot as well as towards your trunk and head. You must do all these steps before bending your fore leg. Ensure that your navel and sternum remain in line with your inner fore femur.
You must fold your abdomen underneath and move forward your bum, similar to all other standing poses (moola bandha). Lifting up your twin frontal hip points is an important step in Virabhadrasana I. Fold your tailbone a bit more underneath and lift your hip points skywards, towards the roof to protect your lower back from feeling hurt. Always keep this in mind that everything from the level of your front hip bones should be lifted skywards, with respect to the front part of your trunk.
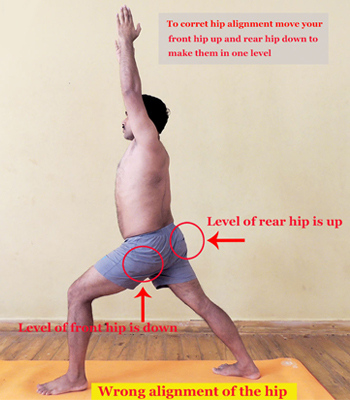
The common mistake in warrior I pose that the hip of your hind leg side is lower than the hip of you1`r foreleg side. To level your hip, you must raise the level of your hind leg by activation this leg to equal it to your fore leg. Do not only focus on squaring your hips perfectly but also take help in it by your abdomen leveled.
Stretch your side or side ribs upwards and extend both sides of your chest from your bums up to your underarms equally, but away from your abdomen. In this action, elongation comes in your trunk. Lift your chest up three-dimensionally away from your lower back to your fingertips and from your pubis to your chin. Develop elongation in trunk area as much as you can but draw your shoulders blades down into your back so that this will assist your in straightening your back bending.
During this pose, we often tend to get our lower back over worked, and upper is spine not lifting and curving well enough. This can be a significant problem during our daily practice of back bending. While in this pose, you must not forget to continuously pull your abdomen inwards and skywards.
Action in palms and elbows
Extend out your arms and straighten up your elbows first. Turn both your arms completely inwards rather than just turning your palms towards each other. You can now bring together your palms, into Urdhva Namaskarasana, if possible. Ensure that you don’t bend your elbows for the sake of bringing your palms together. If you are unable to join your palms with your elbows while keeping them straight, then try keeping your arms strongly parallel and extending towards the roof. In case you feel that your arms are tiring out, then you might want to cross your thumbs, as doing so will give you strength to continue holding your arms upwards towards the roof. Do it only if you need it and try not to make it a routine habit during practice of your yoga poses.
Action in your arms
Lift your arms up more from the side of your outer underarms, and also from your inner arms though it is a bit more difficult. During this time, you must rotate your triceps towards each other. Also, keep your trunk and arms lifted up to maximum towards the roof, while allowing your legs and groins to move downwards towards the floor.
Action in your shoulders
Bring back your thoracic spine inwards and open up your chest before bringing back your head and looking at your hands that point towards the roof. In order to lift up your chest, use your arms firmly with your collarbones broadened up to the sides and your trapezius muscles are moving down your back.
With wall and bolster
An easier way to practice this pose out is by trying to do it against the wall. Move your toes up the wall with a wooden block or a bolster pressed on the side of the wall with your upper front tibia.
To keep your trunk erect, you must press your fingertips on the wall. Ensure that your pose is long enough so that your frontal thigh remains parallel to the floor and you should be able to feel to your rear ins-step alignment (this might mean moving your hind foot way back, more than you usually do). Next, your job is to square your butts up to the wall that is in front of you. Try to turn your hips as much as possible, while using your hands on the wall to help in turning your hips. Pull the back part of your abdomen inwards towards your fore knee.
Despite all your hard work, try to calm down and normalize your breathing as this is a tiring pose and consumes a lot of energy. Instead of tightening your teeth during this pose, breathe into them. Breathe in and breathe out while keeping your face relaxed.

- Warrior pose named warrior because of its physiological effect on the body is like that. This pose brings transformation in the muscles of the thighs and legs make them as strong as a warrior.
- Does complete extension of shoulders, chest, lungs which help in increasing lungs capacity which in turn increase overall power of the body.
- Increases overall strength of back muscles, shoulders and arms and legs muscles along with strengthening calves, ankles and femurs.
- People suffering from high blood pressure and heart problems should not hold it longer.
- People suffering from knee pain should avoid this pose
- People suffering from shoulder pain should keep their arms lifted and parallel to each other, in fact, a bit wider than parallel.
- People having neck problems must keep their head in neutral position and avoid looking towards their hands.
During Anatomy classes, stress is laid on correct alignment and fine-tuning of posture using ankles, neck, shoulders, chest, lungs, abdomen, calves, groins, thighs.
- It is mild asana for those suffering from Sciatica, and helps provide relief from it.
- It a good asana for increasing strength in legs and thighs for sports people like cricketers, footballers and runners. If this pose hold for long time 5-10 mints it may be very helpful pose for increasing muscles power.
- It increase concentration and balancing powers of the body
Beginners face difficulty in keeping the rear heel grounded, with extended lower back in this pose. To address this issue, you can raise your rear heel with the help of s sandbag or a hard pillow or a wooden block.
Virbhadrasana I is the most commonly used pose for beginning Virabhadrasana III and revolving triangle pose.