Utthita Parsvakonasana
Posted On : 15 September 2016.
Posted By : Yogi Mahesh Chetan.
Utthita Parsvakonasan
Hindi Name - Utthita Parsvakonasana ( English - Side Angle Pose):
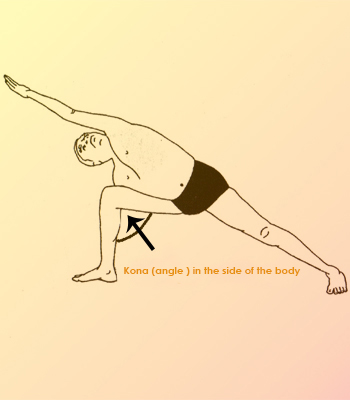
Utthita means 'stretched' also 'standing' and Parsva means 'side', and Kona means 'angle'. Together Utthita Parsvakonasana means 'body extended on the side having angle in side of body'. Practicing this pose extends the top portion of your body through your uplifted arm, and from your back part of the body. You can start this pose by getting into Virbhadrasana II first. Before you move your torso down into Utthita Parsvakonasana, you must carry out the movements of Virbhadrasana II clearly. Utthita Parsvakonasana is nothing but a blend of Trikonasana and Virbhadrasana II. See to it that your fore knee remains at its place over your front foot as against the tendency of allowing it to come to the inner side of your front foot. You should remain conscious not to let this happen.
Leg & Feet Movements
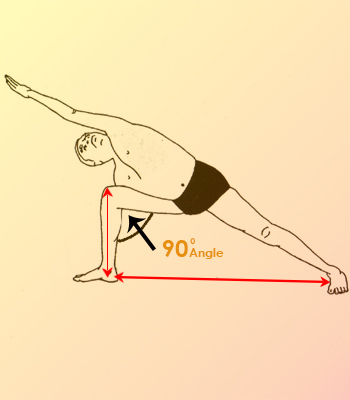
- Your feet should be distanced apart considerably for this pose as compared to Trikonasana.
- The 2nd toe of your front foot should be at the side and at 90°
- Your foot alignment should be such that a line drawn from the heel of your front foot should cross the arch of your rear foot at the center.
- Straighten and widen the soles of your feet and spread out all your toes wide open and stretch them as much as possible, without gripping the floor with them.
- Outward rotating movement of thigh.
- Movement of inner thigh towards the outer one while keeping the whole leg lifted off and way from the floor.
- Lifted up movement of inner ankle towards the outer one while keeping the outer tip of the foot pressed down.
Though Parsvakoansana is considered as a side stretch pose, it stretches upper part of the body strongly on both sides, and can be done easily by elongating your chest equally on both sides. Try to stretch and elongate your bottom part of chest as much as you stretch its upper part. Ensure that the weight of your chest should not fall on your lower arm and your ribs should not rest on your frontal femur while practicing this asana/pose (Your lower ribs might touch your thigh but that is acceptable).
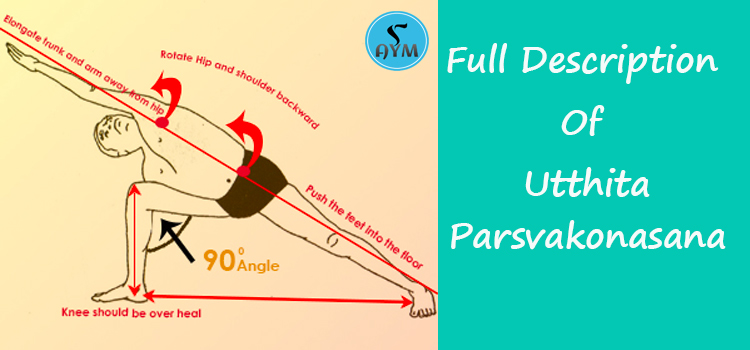
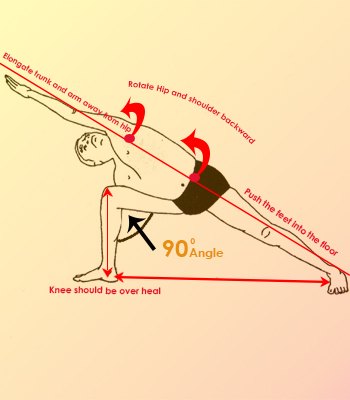
Alignment of spineNow straighten out your spine in a straight line, up from your rear leg and extend your chest as much as you can, towards your front leg. Revolve forward your underside ribs and bring back your upper ribs. Next, turn around the skin of your lower ribs skywards, and in the direction of your upper underarm. Lean back slightly with your chest and feel the sensation of doing so, as this is not a real action and has to be thought of and felt only.
Use your upper hand for reaching under your abdomen and move the flesh of your side abdomen across your frontal femur towards the front part of your body. This movement will help your chest move upward towards the roof. As you turn your chest in the direction of the roof, revolve your naval in the same direction as well.
The inner edge of your lower elbow should be revolved such that it must face the same direction in which your lower foot is pointing at. This should be followed by pressing your lower leg and forearm together. You will notice a strong co-relation between your frontal knee and lower arm while doing this pose. In order to know the advantage of what this pose dose for your shoulder, you must turn your triceps towards your femur and press your femur against your triceps. See to it that your knee towards triceps movement should be much stronger than your triceps towards the knee movement, as this movement will help you in moving back your frontal knee.
Shoulders AlignmentPull back both your shoulders specially your upper shoulder, which should be pulled back strongly. Now turn our upper collarbone backwards in the direction of the edge of your shoulder on the same side. This movement will help you in lifting up the central part of your trunk/chest.
Over all AlignmentNow think of an imaginary line starting from your outer back ankle and extend it up to the upper part and outwards through your fingertips. Your upper arm should be in line with your mid-frame (torso), instead of letting it slip downwards. You must focus on maintaining this line and increase the stretching time gradually. The energy that you use while maintaining this movement will be divided close to about the upper part of your butt.
You will be able to feel your energy moving down your back leg, below your butt; and moving up through your arm, above the hip portion. While getting out of this pose, pay heed to your frontal knee, such that it should not turn to the inner side of your body when you lose your concentration for a while.
- It strengthens up your ankles, knees and legs resulting in enhanced performance while doing various asanas.
- It one of the best pose to remove defects from the skeletal system of the body.
- It also increases height of every individual by removing body curvature and keeping joints space.
- It expands the practitioner’s shoulders, chest, waist, spine and loins, which in turn helps in maintaining balance of the body while doing asanas.
- This asana helps in revitalizing the abdominal glands as well as the abdomen, which in turn helps improve digestion.
- It is very good asana for increasing strength of thighs for sports personals.
- Increases overall stamina of the body.
- High or low blood pressure. Those people should not practice those movements in which lots of stretching, bending and turning around is done.
- Neck problems, as such people should not do poses in which neck-turning is done to either look up or down; instead they should look straight ahead in the forward direction with both sides of the neck stretched evenly and easily.
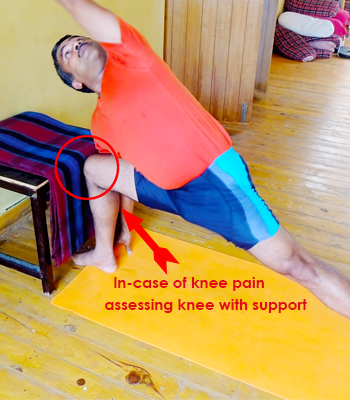
- Knee Pain should not bring any strain on the knee for this you can use some support with wall and a stool or chair.
- Legs - important in stretching poses.
- Ankles - important in twisting and turning movements.
- Groins - important for bending movements.
- Chest - essential for breathing in and out and pumping up movements.
- Lungs - significantly essential for breath in and breath out exercises.
- Shoulders - essential for round, twist and turn movements.
- Spine - It is essential for all bending poses.
- Abdomen - Significantly important for carrying out strong stretching postures and for breathing exercises.
- Heart - Tones the muscles of heart resulting in improved and fast breathing and better blood-circulation.
- Endurance - Increases the body's internal and external endurance.
Constipation - It helps deal with constipation problems through twist, turn, stretch and holding movements.
Infertility - It improves fertility as body parts namely inner frontal thigh, hips and pelvis are involved in stretching, bending and position-holding exercises; which in turn strengthen them by increasing their caliber.
Low Back Ache - the lying down exercises on floor and sitting erect movements done for bending and stretching help in strengthening the back and spinal cord, resulting in giving relief from lower back ache; as these movements also include relaxation at the end of movements.
Osteoporosis - Various poses of this asana include light bending and stretching followed by stronger bending and stretching movements, resulting in increasing the strength of bones and muscle tissues.
Sciatica - Various movements done through stretching and bending help dealing with the problem of sciatica as hips, femur (thighs) and back are also involved in those movements, and thus strengthens them while reducing pain with every passing day.
Menstrual discomfort - Many movements carried out in this asana include bending, stretching, twisting and turning of hips, femur, wasit, abdomen and lower back, along with breathing exercises which provide relief to women and increase their endurance against menstrual discomfort and pains.

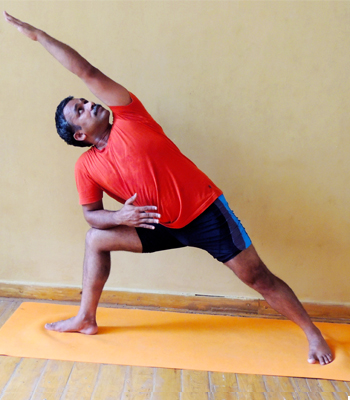
One of the most difficult parts of this movement is keeping your frontal knee pressed backwards in the direction of the wall behind you, so that you can seldom take your lower hand towards the floor. You can also keep a wooden block on the inner side of your front foot as this will enable you to press that arm to your frontal knee, and this in turn will help you in getting the push-backwards movement from your frontal knee. Once you have got the feeling of this movement, pull back your lower hand and take it to the outer side of your front foot to make a classical pose.
With strep and weight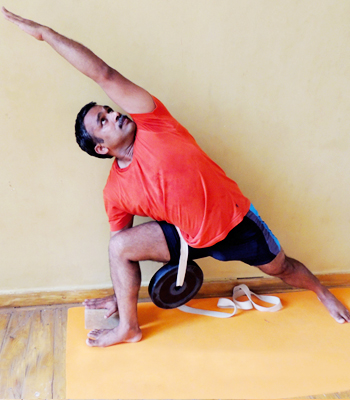
Now we will tell you about certain movements which will help you in getting the right feel of doing proper poses while using frontal femur joints during Utthita Parsvakonasana. Fasten up a yoga band into a mid-sized hoop and slide it on your fore leg after which you must carry out the first two steps of this pose, as described in the main part of doing this assana. Bring the strap in a cosy position towards your right loin and into the area where your femur touches the abdomen. During this time, ensure that the yoga band doesn't touch the ground. Now complete the action of this pose by hanging a 10 pound weight from the hoop. Your right femur joint must be exactly under the yoga-band, which you must release and allow its tip to drop within the weight and towards the ground. This action can and should be used to bring the femur in a parallel position to the ground with grounded heels and spine stretched a bit more, specifically on the right side of the body. This will also get your actions and pose in correct alignment.
With chair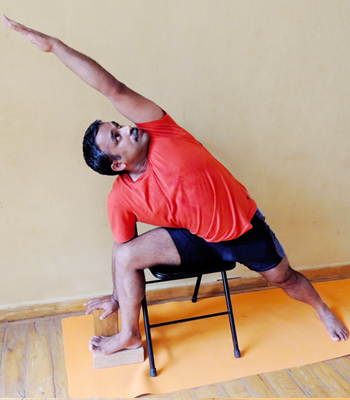
This pose can also be performed by moving your lower arm in front of the bent knee-thigh. This action will help in stretching the front loin a bit more. Carry the rear part of your right shoulder against your inner knee while pressing the tips of your fingers on the floor while lowering your frame on one side. Press down your shoulder strongly into the knee and slid back your frame against the inner part of your femur. Also stretch out the side ribs along the inner part of your upper femur.
Usually it's the beginners who face twin difficulties in carrying out this pose. When they bent their frontal knee into this pose, they find it difficult to keep the back part of their heel fixed/attached to the ground. Also, they are unable to touch their lower hand's finger tips in the direction of the ground during the pose. The solution to the first difficulty is to stay your back foot's sole against the wall. Now while lowering your torso to the side and bending your frontal knee, you must imagine as if you are pushing and distancing the wall away in the opposite direction.
To address the second problem, you must either use a wooden block on the outer side of the front foot to support your hand; or else you can bring your arm to a resting position on the top of your bent knee-femur, rather than trying to make your hand touch the ground.
Even advance students face problem in doing this asana when the weight of their body shifts ahead on the front foot, and disturbs the pose. After getting into this pose, you must lift up your front foot's ball and re-align the anchor of your rear heel. For this, you must press the tip of your back femur joint deep towards its opening while lifting up the inner rear loin inwards and into the leg. You can later ease out your front foot's ball on the floor again. This way you can deepen your asana and improve it further.
A good teacher should know what is wrong pose and why. Below are few examples with explanation.
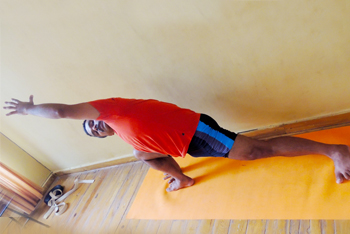
- Below it is wrong pose as hip is dropping down, rear foot is unstable and front knee is over bend.
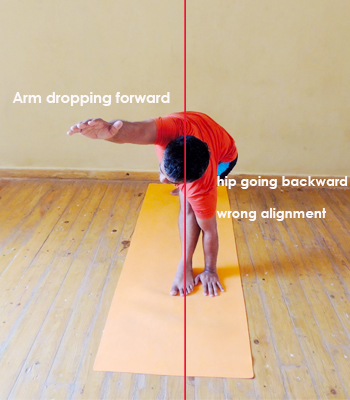
- Wrong alignment due to the hip of the body is going backward and overhead arm going forward.
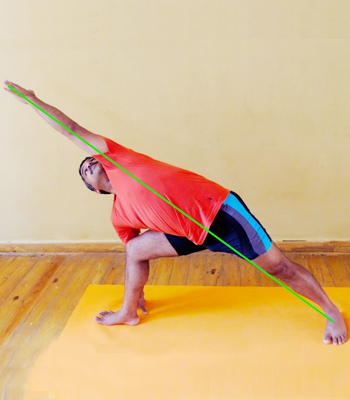
- Another wrong alignment as chest and hip is dropping forward and not proper angle in front leg.