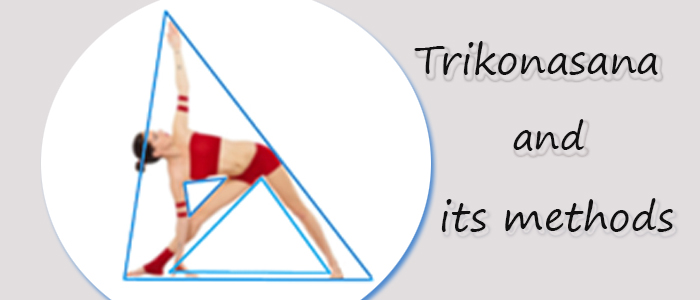
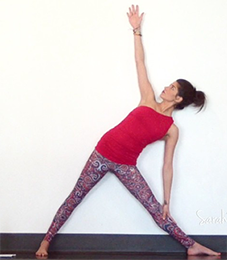
Utthita Trikonasana or Trikonasana
Posted On : 05 Sept 2016.
Posted By : Yogi Mahesh Chetan.
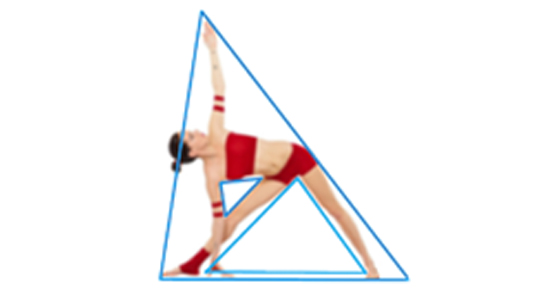
'Tri' means three, 'Kona' means angle. Thus, Trikona asana means Triangle pose.
Utthita - Extended or Standing
Trikonasa or Trinagle pose is a standing, side-bending, balancing, stretching, gentle strengthening, and beginner kind of pose. It is one of the fundamental and basic poses.
Method – step-by-step explanation
Foundation of the pose or Taking Gap between legs
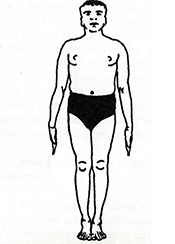
Come out of Tadasana and jump and pull your feet apart with arms on sides in Utthita Hasta Padasana.
Distance between your feet should be sufficient. Energy of the outer part of your legs will escape if there is too much distance between your feet. On the other hand, if your feet are too close, the energy of your inner legs will be lost. You won't be able to engross your quadriceps muscles if your posture is too wide. Meanwhile, the mobility will be reduced in your hips and spine if the gap is too less. Based on your flexibility in the hips and the amount of force you feel in your legs, you will be able to judge a good distance in a few months.
Be Conscious of Back Part of The Body while Jumping
When you jump in or out, it should be synchronised with inhalation and exhalation. Don't jump if you have knee pain or back pain. See to it that your jumping action comes from back part of the body. For this, you must think and act intelligently from the back part of your body. Most of the time we express ourselves from the front side of our body as that is where maximum of our intelligence is and that's why we move from there. When we talk to people, we do so from the front, as at that time we are expressing our self to them. When we are facing someone, we see that person from the front and adjust our eyes accordingly but we can’t do the same for the back part as we can't see it. It is due to this reason that we completely ignore the back part of our body. Yoga includes the whole body and front as well as back parts of the body are considered as equally important. You can feel subtle consciousness when you try to feel that you are jumping from the back part of your body while jumping in standing pose.
Keep Tadasana or straight your every part of body
You must pause for a minute while doing Uthita Hasta Padasana, and feel and observe the change that took place in your body. Despite having spent some time in Tadasana, one forgets the actions of Tadasana before jumping with feet apart as it is human tendency and very natural. You must seek Tadasana in every part of your body even after jumping with feet apart. You must level your hips and see to it that none of them is higher than the other. Even your feet should be turned equally outward instead of one being turned more outward than the other. You must lift your inner legs upwards towards pelvis and squeeze and move your outer legs inwards while being in Utthita Hasta Padasana. You must fold your tailbone beneath and lift your thighs and knee-caps, similar to that done in Tadasana. Now you must strive for Tadasana in your chest .You must extend your chest fully from the center three diamentionally and equally in all dierction of the chest. Now move the frontal part of your chest skywards, over the shoulders, going down your back similar to the position of waterfall. You must repeat these actions during transition phase from one asana to another.
Increase stamina through Utthita Hasta Padasana
While practicing Utthita Hasta Padasana, you must ensure that your triceps are engaged upwards into the humerus bones, while lifting your arms from underneath your arms while holding your arms to sides for longer duration. Your trapezius muscles should be downwards so that you can increase the time of holding your arms, resulting in increasing your stamina. In order to open your chest, you must press down your elbows with open palms. Your thumbs should be stretched in such a way that your little finger should be connected to backside of your chest, middle finger with mid-portion of chest, and thumb with frontal side of your chest.
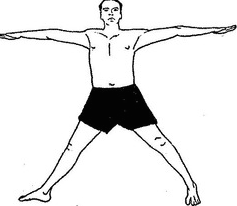
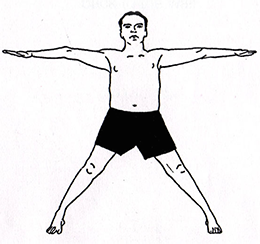
Now turn your feet to the side in Parsva Hasta Padasana. While turning your front foot outwards to 90º on the side, you must turn your entire leg to the side and not just your foot and lower leg. Your front leg should be turned in such a way that your thigh should turn to the side in the direction of your foot. Your front heal should be in alignment with your ipsilateral bone (middile of other foot).
Your front foot's 2nd toe should be at 90º to the side. In case of knee problem, you must turn your front foot as well as your knee to outwards. Your problematic knee has to be your front knee during this pose but it should not hyperbend. Your feet should be aligned in such a way, that if a line is drawn from the front heal, then it should intersect your rear foot in the mid-part. It's fine if you keep your heals aligned on the same line during early stages of this asana, as it helps in maintaining balance and in keeping your front foot pressed down strongly towards the floor. It should be noted that those who have broad hips or upper hip is moving backward, will have to do heal to heal alignment instead of aligning heal to arch in most of the standing general poses. In case of expecting mothers/women, the stance has to be wider and more space will be needed for it. You must open your toes to maximum and stretch them without grasping the floor while being in Tadasana.
Solving physical problems through Parsva Hasta Padasana
In order to seek Tadasana, you need to solve multiple problems while practicing Parsva Hasta Padasana. You will observe that the knee of your front leg which was turned at 90° outwards, now slumps inward as a result of your thigh dropping inwards. Much efforts will have to be made to move your inner knee in the direction of your outer thigh while strongly turning your front thigh outwards. You will find that despite putting a lot of efforts, you won’t be able to do it enough. This is because of turning the knee, especially the upper thigh at 90° on the side, facing your foot. You must keep turning it to the outer side until you reach the perfect position. You must bring your outer ankle inwards in the direction of inner ankle in order to stay on the inner side of your front foot. This will happen as people doing yoga have the tendency to move to the outer side of the body. You must move your outer thigh inwards in such a way so that the weight of your body should be more on the inner side of your front foot. Avoid falling on the outer side of your front foot. You must remain on the inner edge of your front foot while bringing outer thigh and outer calf inwards, towards your mid-line. Now adjust your front leg and let it come to the inner part of your front foot. It should come on your inner heal and should not be leaning out. The outer edge of your rear foot should be pressed down to the mat. During this time, you must not come on the inner edge of your rear foot.
Transition from Parsva Hasta Padasana to Tadasana to Trikonasana
While practicing Parsva Hasta Padasana, a tendency develops that you automatically tilt your pelvis towards your front leg while turning your feet and legs. Despite being in transition, you must go for Tadasana by levelling your torso and pelvis and continue to lift up your chest and side-ribs. Now turn back your torso and keep it squared to the front wall and away from your front foot. There is a different type of action for beginners in which shoulders are twisted back and away from the front foot. There is another action for intermediate practioners in which one twists back from floating ribs with front knee to the outer side.
Those who are practicing advanced stages of yoga can try advanced action in which rear-sided abdominal muscles (naval area) are taken back while upper front things are kept out. In other words, you must turn away from your belly with torso facing square forward. You must not go to Trikonasana until you have achieved the above mentioned positions.
Now you must create an anchor on the outer side of your rear foot before moving into Trikonasana. You must maintain this pose and exhale while going down with lowered torso. Inhale when you return to the standing pose.
Movement of the legs and feet
The weight of your body should be equally distributed between the inside edge and the outside edge of your front and rear foots while being in Trikonasana. Your weight should be divided between your feet in such a way that your each foot should bear equal weight on front of heal and rear of your foot, similar to that as in all standing poses. You must put complete weight of back leg and hip to push the outer part of your back foot. Ensure that the big toe of your front foot should be pressed down to the floor as we humans have tendency to roll to the outer side of the front foot. If you are comfortable then slightly turn your foot outward.
In case you feel like moving one of your feet, always move your rare foot if you feel like correcting your stance while in this pose, as it is hard to move the front foot. If you have a problem in keeping stable to balance your body then you can move your rear foot inward to assist yourself.
Your current position in which your pelvis is rotated sideward, almost close to plane of the leg, is one of the 3 main asymmetric wide-legged standing position. (Parsvakonasana and Virabhadrasana II are the other 2 asymmetrical positions). Yoga practitioners have a tendency to let the rear thing and knee move forward while the rear hip falls inside. In order to keep your rear knee rotating upwards towards the roof in all the above poses, you must resist it with a strong backward action in rear hip, thigh and knee. Now move your rear groin away from your front one and take your rear thigh and bone towards back of the leg. Throughout this pose, you must strongly pull back your inner thigh, rear hip and knee and hold them there. Your back foot’s outer edge shouldn’t come off the floor and should instead be pressed down. Now press down the outer edge of your rear foot, drawing up on rear outer ankle as you establish and maintain Tadasana.
3 Vital actions of Trikonasana
Three vital actions of rear leg in Trikonasana are: 1.) Inner ankle presses outer edge of the foot while moving towards outer ankle. 2.) the thigh revolves upward and outward and 3.) The outer thigh is lifted by the inner thigh while keeping it up and away from the ground. All 3 above mentioned actions are used to keep the rear foot pressed down on the ground.
Instead of keeping your front thigh relaxed, rotate it inward. You can counter this by strongly contracting your front butts and external hip-turners so you can rotate your front thigh. This way you can centre your knee, thigh and shin directly in a centre-aligned position of your front foot. While doing so, your front foot shouldn’t fall down and you must keep your weight balanced evenly across the sole of your front foot, while turning your front leg towards outer side. Now lift up your front foot towards your front hip and bring it to the inner side of your inner ankle. Now remain steady and press down the inner part of your front foot, stretch and pull up in the line diagonal to your front big toe, moving up within your outer front hip. Though a bit difficult, but this action helps in rotating your front thigh.
After subtly performing all above actions mentioned in the above paragraph, you will notice that your intelligence lies in the outer part of your front leg, and that you must bring it in to touch the inner part of your front leg. If you feel like lengthening your inner front leg then you must feel that you are using your outer thigh to touch and lift up your inner front thigh. You will be able to understand more easily about the actions of pelvis and hips, after reading the below paragraph.
Important actions of Pelvis and Hips
Now turn your knees and thighs outward and away from each other in such a way that as if you are feel like opening on the outer side towards legs from your pelvis. If you broaden your pelvis as much as you can, then it will help your action, which in-turn will help you to increase the size of your pelvis. It is very essential to employ your leg muscles strongly to your bones, similar to all standing poses. See to it that your leg muscles should be hugging from all sides. Now squeeze the skin and muscles of your thighs to help lift up your kneecaps in the direction of your groins. You must keep refreshing this action by pulling your kneecaps, every time after they fall. You can get to tighten up your torso forward at the groin, particularly by taking the skin of your forward thigh, straight into the hip on side. Try drawing them strongly into your knees in addition to lifting your knees.
You will feel as if your thigh-skin is drawing strongly into your femur, thigh bones and all the way to the back portion of both sides of your legs. Spread out your skin at the back of your knees and allow broadening the back part of your legs. Doing this pose will strongly expand the muscles of your frontal hamstring. You aren’t utilizing your muscles enough if you aren’t feeling every part of your leg in various standing poses. You must remain aware during these poses for which you must increase your consciousness in every pose by feeling it thoroughly. You must fold your sacral vertebra beneath, despite drawing your thighs strongly into the back part of your legs. This is one of the common positions of Tadasana in standing position.
Just don’t rest by hanging out on your front leg. Now lift your entire leg up to your hip and lift the skin on the back of your thighs and hamstring, in the direction of your butts, similar to almost all other standing positions. Next, equally raise the inner and outer sides of your knees. During this time, the muscles of your legs must be moving in and skywards, giving the feeling of expanding and spreading your bones outwards. Same process is applicable for your arms too.
See to it that you don’t over-stretch your knees in Trikonasana, similar to the kind of extensions done in Tadasana and Uttanasana. You must learn to extend your legs completely by straightening your legs without over-stretching them.
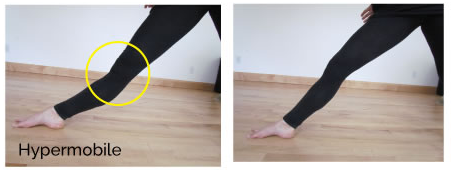
Now pull your thighbone skyward, and out of your front knee as this will provide some minor forward movement. During this time, you must maintain some weight towards your front foot. Now this is similar to Tadasana in which your calve-muscles are busy in your tibia and are pressed forward instead of bowing backwards. During these poses, you will try to keep your knees straight, but somewhere in your mind you will be bending them slightly. Now take back your femurs but if you feel that the crown of your tibia is slightly moving forward, then you must resist this action. While you draw your kneecap inward, you must not push back your knee. This position is called ‘Uttanasana legs’ or ‘Trikonasana legs’. There is a way of feeling that you don’t over-expand your knee so that, that particular area of your leg doesn’t seem to be dropping down, and this can be done by placing a block below the top of your front calf.
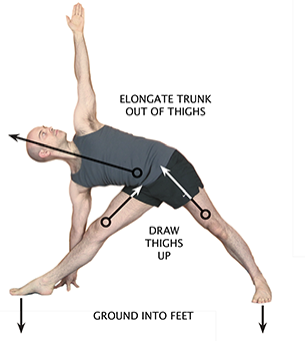
You must strive to get the feeling of as you take your torso to the side, strive for the feeling of stirring from abysmal to your frontal part of groin and hip part, similar to that of hinge. Now you would like the bowl of your pelvis to move forward to your front leg as if water is being poured down from a vase. Trikonasana shouldn’t be considered as a side extension in the Iyengar style of yoga. Though you would want to avoid it, yet there might be a little bit of bending of side portion of spine. To counter this, you can wind down from your butts instead of bending from the side of the body in Trikonasana.
Try extending the sides of your chest equally on both sides, from armpits to hips. It’s always easy to stretch and extend the upper and lower side of the body. Try stretching the lower side as much as you stretch your upper side. Remembering Pranayama, try to separate each rib from the other one on your lower side. We have the tendency of over-stretching the upper side and squeezing the lower side, which should be avoided. You must pay heed to the way your skin feels between your lower ribs and hips on the lower side of your chest. If you feel strongly that your skin is stretching then it means that there is excessive bending in your torso and spine. You must feel that your bun is moving skywards, out to your pelvic arch, equally on both sides. Now move away your hips and top of your head from each other as much as possible. Next, bring the portion of your upper ribs, close to your under-arms (axilla) and diagonally downwards in the direction of your front foot. Tightening side muscles of upper part of your chest will help in keeping it flat. You must also pay attention to the lesser part of your body while keeping the lower underarms chest part open. Now take your pelvis first towards the floor and then towards your head, followed by bringing your upper pelvis towards your body. Despite being in this pose, try making ribs on both sides to feel the same exactly.
Relax and free your loins and don’t keep them stiff. Extend your front groin by distancing your front hip and back loins away from your front foot, as far as possible. In order to help turn your abdomen more towards the plains of your legs, you must fold your frontal hips and move them forward, towards the wall facing you. Now fold your butt underneath and distance it away from your lower spine, similar to that done in Tadasana. You will have to move forward the left side of your hind part while you pull back your inner loins, in case you are doing Trikonasana on the left side of your body. If you are seeking help to move your hip bone towards the plain of your legs, then you must pull back your rear hip in the direction of the wall. Now you must seek unity while being in opposition by pulling back your hindmost sitting bone and by moving forward your frontal sitting bone. You will now feel that the front part of your girdle is opening up, which is a significant part of Trikonasana.
The front part of both your butts should move ahead in the direction of the wall that is in front of you (this is one of the vital movements of this pose). You must also revolve your butts underneath, towards your anterior leg. While your hips will fall back in the direction of the wall, simultaneously your inner loins and rear thigh will also fall back. These are the two refined areas in your hips where light can be brought to the inner area of your thighs. Usually we don’t spread our intelligence to these parts as they are considered as principally dark areas of the body. It’s not essential for you to have your hips in ‘one top on the other’ position as practiced in Ardha Chandrasana as that posture is anatomically impossible to do in Trikonasana.
Yoga practitioners, especially yoga beginners have the natural tendency of fearing to fall back, due to which they shift their weight on the inner part of their front leg. You can and you must counter this predisposition by completely turning your chest to the same side as are the plains of your legs. Your lower side ribs should be directly below your upper side ribs while your shoulders should be upright and erect towards the floor. You must have the need to feel pulling your upper shoulders and upper side ribs back and moving your underside ribs forward. Try to feel that you want to reach back and put your back on an imaginary wall behind you while turning your upper body towards the rear end. Though it will not be a true movement but you must try and feel numbly tilting your chest, followed by revolving your chest skywards, towards the roof. An easy way to think about this pose is by spinning your hips, rear thigh, chest, and abdomen skywards as one unit, in the direction of roof. You can also try turning your navel in the same direction as that of your face.
Feel as if you are faintly bending your back behind, in this pose. The skin of your frontal chest should move in the direction of your head, and away from your hip; while the skin of your back should move in the direction of your hip. During this time, you must extend your hip bone towards your jaw-bone. Now pull your gladiolus away from your sacrum and fold your hip bone at the front as this will help in stretching the front part of your trunk. Your shoulders’ edge should be drawn unto your rear, while your chest should feel uplifted to open the front portion of your trunk, to help with the opening. Now press the skin of your chest and extend it apart along with your collar bones. Next, move your under-arms and chest in round motions and extend and lift your chest up as you breath-in. Turn your trunk towards the roof as much as you can, when you breathe-out.
You can press your back heal to a wall with front foot in the opposite direction and away from the wall. This way you can practice coordination in your leg and trunk movements of Trikonasana. Now bring the outer front thigh back to the wall with the front part of your loins deep into your underarms when you stretch lower part of your side ribs while getting in this pose. Another way to feel the same is by placing the front foot higher than your back foot. For Example, you can place it on a wooden block or against a wall and then return to the pose. Meanwhile, remain alert and feel the sensation created in your frontal loins.
You must steady your arms and elbows while moving in this pose. Extend your clavicles (collar bones) and move your shoulders towards the wall in backward direction while widening and distancing your shoulders away from each other. Now open up and stretch your chest to maximum, by pulling your arms apart, especially your upper arm to widen up and expand your chest. Lengthen through little finger of your upper hand and from thumb of your lower hand. Now pull your triceps muscles in the direction of your under-arms, especially towards the lower ones. You will feel that your bones are stretching outward as your draw in your muscles. You will feel your chest lightening up when you move your arms outwards. You will have to double up the utilization of your upper hand, more then your bottom hand as the upper hand won’t have any prop or floor to hold on to for support.
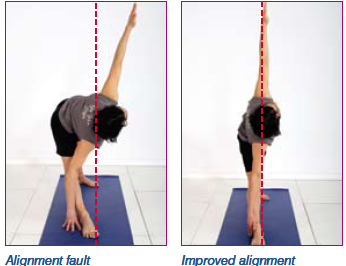
Now face in the direction of your front foot and turn the crease of your inner elbow of your lower arm in the same direction. Now turn your biceps in the direction of your head, such that they face them. When you rotate your chest skywards, your lower shoulder would tend to twist internally, to counter which, you must focus on turning it outward. Now pull your shoulders back while busying your inner scapula (inner shoulders), and embrace them in the back part of your body. Next, move your cowl muscles down to your back. During this time, extend your neck and distance it from your shoulders. You must push hard to keep your legs, trunk and arms together in a vertical line. Think of an imaginary line drawn between your feet, and try to bring all body parts on it. Now pull your shoulders back as it will assist in achieving the body’s alignment.
Stretch and widen up your hands with your fingers slightly touching each other. Expand and stretch your fingers and open up the skin of your palm’s base. Later on, see to it that the skin of your palm doesn’t get contracted when you connect your fingers. You must try to join your fingers by maintaining openness and the skin of the inner part of your palm should move in the direction of your fingers.
You can use the “phonebook method” tactic to get down to lower height if you are using a wooden block for your lower hand in Trikonasana or for various other poses like Virasana, in which you sit on a block. Though it is a bit time-taking, but in order to improve your practice, you can tear off one to five pages out of the book and reduce its height.
Head and face play an important part in all poses of yoga. If they are not in the right positions, then the practioner might not be able to carry out the poses correctly. So when we talk of head, start with looking towards the front wall with your face. Now turn your head backwards, in the direction of the wall behind you, and then turn it skywards in the direction of the roof. Your neck will be in a much better position in this sequence and you will be able to take the top part of your head back, in the direction of the wall behind you, just before turning it upwards. For better result take a look at the photo of Mr. Iyengar in the book titled ‘Light on Yoga’.
You must now look at the upper part of your hand with your full face towards it, instead of looking at it from the corner of your eyes. In order to carry out this movement, you must pull your shoulders back. Now stare at the thumb of your upper hand from your lower eye, and as much as from the upper eye; and your nose should be pointing towards the roof for as long as you feel comfortable so that your neck doesn’t gets strained. Now get out of the pose by easing up your eyes, tongue, face and throat and relax your face completely. You can now relax by getting them back into sockets and feel tension free henceforth.
You must strive to get the feeling of as you take your torso to the side, strive for the feeling of stirring from abysmal to your frontal part of groin and hip part, similar to that of hinge. Now you would like the bowl of your pelvis to move forward to your front leg as if water is being poured down from a vase. Trikonasana shouldn’t be considered as a side extension in the Iyengar style of yoga. Though you would want to avoid it, yet there might be a little bit of bending of side portion of spine. To counter this, you can wind down from your butts instead of bending from the side of the body in Trikonasana.
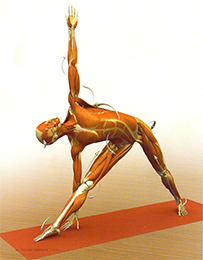
Effects on skeletal system and muscular system
Triangle pose is one of the best pose to align and straighten the skeletal system of humans. As we bend on left side and right side in this pose, and after coming out, our skeletal system becomes straight. Because of this system, it helps in Scoliosis disease. If you practice this pose, you won’t need any chiropractic treatment. It strengthens the backbone, particularly lumber-area, waist, thighs, knees, and ankles.
Effect on body balance
Triangle pose improves the balancing power of the body (through which we make balance while standing). Usually in old age, balancing power goes down if we don’t exercise properly. Triangle pose is very gentle pose which keeps the balancing power up to date till old age.
Therapeutic Effect- Anxiety, stress, depression.
- Flat feet and strengthens legs.
- Infertility, best pose for kegel muscles.
- Osteoporosis, particularly in back bones.
- Sciatica (only assisted triangle pose).
- Good pose up to second trimester of pregnancy.
- For Heart: In order to keep your heart functioning properly, you can put your upper arms on your hips and can practice by standing against a wall.
- Practice against a wall. Keep the top arm on the hip.
- For controlling high blood pressure: When in final pose, you must turn down your head and look towards the floor.
- High blood pressure: Turn the head to gaze downward in the final pose.
- For neck related problems: Always look straight and in forward direction without turning your head towards the roof, and both sides of your neck should be evenly stretched.
- Neck problems: Don't turn your head to look upward; continue looking straight ahead and keep both sides of the neck evenly long.
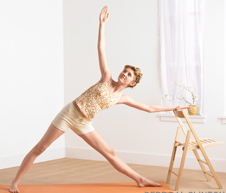
Perform the pose with wall if your lower part of side is contracting, use of chair helps to elongate the side.
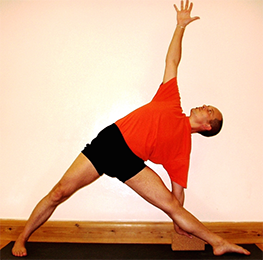
Brace your back heel or the back of your torso against a wall if you feel unsteady in the pose.
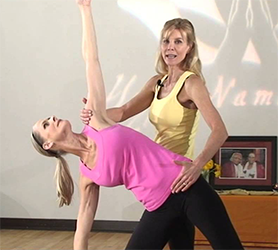
This is a method to give an assist to align and correct the pose. Also a perfect example of art of hand on body adjustment while in triangle pose.